What’s Retrieval-Augmented Technology?
Massive Language Fashions should not up-to-date, they usually additionally lack domain-specific information, as they’re skilled for generalized duties and can’t be used to ask questions on your individual knowledge.
That is the place Retrieval-Augmented Technology (RAG) is available in: an structure that gives essentially the most related and contextually necessary knowledge to the LLMs when answering questions.
The three key parts for constructing a RAG system are:
- Embedding Fashions, which embed the information into vectors.
- Vector Database to retailer and retrieve these embeddings, and
- A Massive Language Mannequin, which takes the context from the vector database to reply.
Clarifai supplies all three in a single platform, seamlessly permitting you to construct RAG functions.
How one can construct a Retrieval-Augmented Technology system
As a part of our “AI in 5” collection, the place we train you how one can create wonderful issues in simply 5 minutes, on this weblog, we are going to see how one can construct a RAG system in simply 4 strains of code utilizing Clarifai’s Python SDK.
Step 1: Set up Clarifai and set your Private Entry Token as an atmosphere variable
First, set up the Clarifai Python SDK with a pip command.
Now, you have to set your Clarifai Private Entry Token (PAT) as an atmosphere variable to entry the LLMs and vector retailer. To create a brand new Private Entry Token, Enroll for Clarifai or if you have already got an account, log in to the portal and go to the safety possibility within the settings. Create a brand new private entry token by offering a token description and choosing the scopes. Copy the Token and set it as an environmental variable.
After you have put in the Clarifai Python SDK and set your Private Entry Token as an atmosphere variable, you possibly can see that every one you want are simply these 4 strains of code to construct a RAG system. Let’s take a look at them!
Step 2: Arrange the RAG system by passing your Clarifai consumer ID
First, import the RAG class from Clarifai Python SDK. Now, arrange your RAG system by passing your Clarifai consumer ID.
You should use the setup methodology and move the consumer ID. Since you’re already signed as much as the platform, you could find your consumer ID below the account possibility within the settings right here.
Now, when you move the consumer ID the setup methodology will create:
- A Clarifai app with “Textual content” as the bottom workflow. In case you are not conscious of apps, they’re the fundamental constructing blocks for creating initiatives on the Clarifai platform. Your knowledge, annotations, fashions, predictions, and searches are contained inside functions. Apps act as your vector database. When you add the information to the Clarifai software, it’s going to embed the information and index the embeddings based mostly in your base workflow. You possibly can then use these embeddings to question for similarity.
- Subsequent, it’s going to create a RAG prompter workflow. Workflows in Clarifai permit you to mix a number of fashions and operators permitting you to construct highly effective multi-modal programs for numerous use instances. Throughout the above created app, it’s going to create this workflow. Let’s take a look at the RAG prompter workflow and what it does.
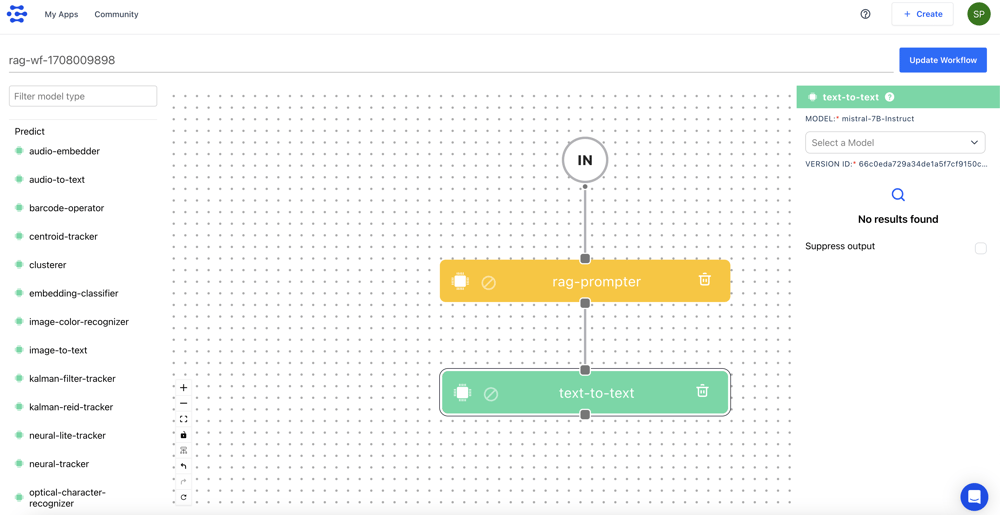
We’ve the enter, RAG prompter mannequin kind, and text-to-text mannequin sorts. Let’s perceive the circulate. Each time a consumer sends an enter immediate, the RAG prompter will use that immediate to search out the related context from the Clarifai vector retailer.
Now, we are going to move the context together with the immediate to the text-to-text mannequin kind to reply it. By default, this workflow makes use of the Mistral-7B-Instruct mannequin. Lastly, the LLM makes use of the context and the consumer question to reply. In order that’s the RAG prompter workflow.
You needn’t fear about all this stuff because the setup methodology will deal with these duties for you. All you have to do is specify your app ID.
There are different parameters accessible within the setup methodology:
app_url: If you have already got a Clarifai app that comprises your knowledge, you possibly can move the URL of that app as an alternative of making an app from scratch utilizing the consumer ID.
llm_url: As we’ve got seen, by default the immediate workflow takes the Mistral 7b instruct mannequin, however there are various open-source and third-party LLMs within the Clarifai neighborhood. You possibly can move your most popular LLM URL.
base_workflow: As talked about, the information shall be embedded in your Clarifai app based mostly on the bottom workflow. By default, it will likely be the textual content workflow, however there are different workflows accessible as properly. You possibly can specify your most popular workflow.
Step 3: Add your Paperwork
Subsequent, add your paperwork to embed and retailer them within the Clarifai vector database. You possibly can move a file path to your doc, a folder path to the paperwork, or a public URL to the doc.
On this instance, I’m passing the trail to a PDF file, which is a current survey paper on multimodal LLMs. When you add the doc, it will likely be loaded and parsed into chunks based mostly on the chunk_size and chunk_overlap parameters. By default, the chunk_size is ready to 1024, and the chunk_overlap is ready to 200. Nevertheless, you possibly can regulate these parameters.
As soon as the doc is parsed into chunks, it’s going to ingest the chunks into the Clarifai app.
Step 4: Chat together with your Paperwork
Lastly, chat together with your knowledge utilizing the chat methodology. Right here, I’m asking it to summarize the PDF file and analysis on multimodal giant language fashions.
Conclusion
That’s how simple it’s to construct a RAG system with the Python SDK in 4 strains of code. Simply to summarize, to arrange the RAG system, all you have to do is move your consumer ID, or when you’ve got your individual Clarifai app, move that app URL. You can even move your most popular LLM and workflow.
Subsequent, add the paperwork, and there’s an choice to specify the chunk_size and chunk_overlap parameters to assist parse and chunk the paperwork.
Lastly, chat together with your paperwork. Yow will discover the hyperlink to the Colab Pocket book right here to implement this.
In the event you’d choose to observe this tutorial you could find the YouTube video right here.